

|
 First step is to put the car on jack stands. The higher you go, the better, up to a point. Basically you want enough room to lay down and have your elbows slightly bent when you're touching the bottom of the midsection of the tranny. This height is optimal for room to work as well as the best position to hold the tranny at. Start off by removing the downpipe and/or catback. For downpipe removal I find it easier to just remove the O2 housing and downpipe all as one. Removing the catback is not completely necessary but it sure helps. Next step is to remove the tranny fluid. It's a big bolt on the passenger side of the tranny (23mm). Next, remove the driveshaft from the tranny, there are 2 bolts that hold the driveshaft center support bearing the frame. If the driveshaft doesn't slide out yet, you can leave it hanging. It is not necessary to remove the shaft from the differential. Now remove the speedometer cable from the passenger side of the tranny. A set of vice grips or pliers will work if you can't get it off with your fingers. Next remove the slave cylinder from the drivers side of the tranny (two 12mm bolts). Now, disconnect the reverse light indicator and ABS switch harnesses with a flat head screwdriver or equivelant. One of them is sometimes on top of the tranny, in which case is easier to remove later. The other connects near the starter. Now remove the shifter from inside the car. To do this remove the black radio trim (number of philip screws varies by year). Disconnect the hazard switch harness, cig lighter harness and ash tray courtesy light harness. Now spin the shift knob counter-clockwise, it may take some force if you've never removed it, but don't worry you won't break it. You should see the shifter boots now. Remove the metal trim on the outside of the boot, you can either remove the 4 bolts with a philips or a 10mm socket, I recommend the socket whenever you can use it since it is less prone to stripping. There are 4 more of those bolt/screws but they are underneath a couple boots, simple pull up on the boots until you can reach those bolts. Before you lift the shifter, make sure the tranny is in neutral. Now if you have removed the charcoal canister or EGR you can pat yourself on the back here as this next part will be easier. From the top of the motor try to remove the top two tranny bellhousing bolts (14mm). Try the exhaust side first for reference. A 14mm ratcheting wrench can really come in handy here. If you can't get the exhaust side don't even bother with the intake side. The intake side is definitely trickier. If you can't get them both it's no big deal, just move on to the next section. Here comes the fun part. First step is to put the car on jack stands. The higher you go, the better, up to a point. Basically you want enough room to lay down and have your elbows slightly bent when you're touching the bottom of the midsection of the tranny. This height is optimal for room to work as well as the best position to hold the tranny at. Start off by removing the downpipe and/or catback. For downpipe removal I find it easier to just remove the O2 housing and downpipe all as one. Removing the catback is not completely necessary but it sure helps. Next step is to remove the tranny fluid. It's a big bolt on the passenger side of the tranny (23mm). Next, remove the driveshaft from the tranny, there are 2 bolts that hold the driveshaft center support bearing the frame. If the driveshaft doesn't slide out yet, you can leave it hanging. It is not necessary to remove the shaft from the differential. Now remove the speedometer cable from the passenger side of the tranny. A set of vice grips or pliers will work if you can't get it off with your fingers. Next remove the slave cylinder from the drivers side of the tranny (two 12mm bolts). Now, disconnect the reverse light indicator and ABS switch harnesses with a flat head screwdriver or equivelant. One of them is sometimes on top of the tranny, in which case is easier to remove later. The other connects near the starter. Now remove the shifter from inside the car. To do this remove the black radio trim (number of philip screws varies by year). Disconnect the hazard switch harness, cig lighter harness and ash tray courtesy light harness. Now spin the shift knob counter-clockwise, it may take some force if you've never removed it, but don't worry you won't break it. You should see the shifter boots now. Remove the metal trim on the outside of the boot, you can either remove the 4 bolts with a philips or a 10mm socket, I recommend the socket whenever you can use it since it is less prone to stripping. There are 4 more of those bolt/screws but they are underneath a couple boots, simple pull up on the boots until you can reach those bolts. Before you lift the shifter, make sure the tranny is in neutral. Now if you have removed the charcoal canister or EGR you can pat yourself on the back here as this next part will be easier. From the top of the motor try to remove the top two tranny bellhousing bolts (14mm). Try the exhaust side first for reference. A 14mm ratcheting wrench can really come in handy here. If you can't get the exhaust side don't even bother with the intake side. The intake side is definitely trickier. If you can't get them both it's no big deal, just move on to the next section. Here comes the fun part.
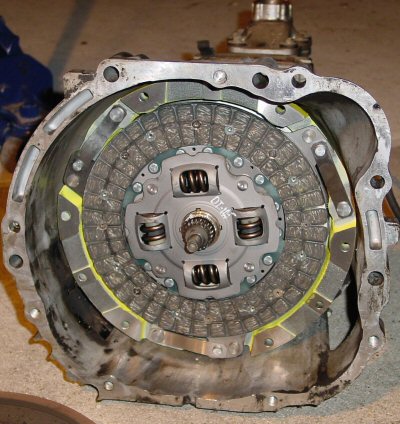
Tranny tilting: Remove the two lower motor mount nuts (17 or 19mm depending on your year). Next put a jack underneath the rear of the tranny preferably far away from the tranny mount. Remove the four tranny mount bolts (12mm) and let the jack down. The tranny and motor should now be tilted 10-30 degrees depending on your year and motor mount condition. If you've got a 89+ with liquid mounts you may want to use a jack and a few blocks of wood on the crank pulley to hold the motor tilted. The tilt is necessary when reinstalling the tranny and keeping the motor tilted is less stressful on the liquid mounts. If you've got 86.5-89 with solid mounts you can do this as well, but your mounts won't be damaged by repeated motor tilting. Solid motor mount owners will notice much less motor tilt then liquid mounts, and may find it necessary to actually force the motor to tilt even more with the jack and wood combo. You don't have to worry about pinching wiring or breaking anything with the motor tilt, there is actually just enough slack for everything to clear. Of course it's a good idea to watch everything, especially the fan and shroud, if your shroud is damaged or mounted incorrectly you may have to assist it to clear the fan. Now that the tranny is tilted you can tackle those two top bellhousing bolts from the bottom if you didn't get them earlier. You will need a bunch of extensions, I suggest at least 3 feet. One or two wobblers is also highly recommended. Assemble the following - 14mm socket, 6-24" of extensions, wobbler, 6-24" of extensions repeat if possible, then ratchet. This is much easier with two people but can be done with one. Slide the whole assembly in from the back of the tranny if you've got an extra hand or from the side of the bolt you're working on if you're solo. Concentrate on keeping the socket completely straight on the bolt. You REALLY do not want to strip that bolt. With those two out of the way you can work on the remaining bellhousing bolts (all 14mm). I suggest working from the top down and leave one of the bottom ones still snug. Clutch removal - there are two basic methods, I will describe both. If you have a W58 you don't have to worry about this section :) On either method you'll need to remove the drivers side access panel (two 12mm bolts). First method - Probably the easiest method is to remove the shifter fork from the tranny. It's strange on some Supras you will need to remove two 12mm bolts inside the tranny with a wrench to get the fork out, on others the fork will just pull out. Second method - This one I prefer, force of habit I suppose. On this method you remove the pressure plate from the flywheel while the tranny is still on the car. There are six 12mm bolts that hold the pressure plate to the flywheel. You remove them using the access panel. Loosen them all as evenly as you can, 3 passes should suffice. You may find it necessary to have a friend hold the crank pulley still with a 19mm socket and a ratchet or you can prop something up to keep the motor from spinning. With either of those methods the tranny should slide off easily now when you remove the final bellhousing bolt. If you've got the R154 be careful as the tranny is extremely heavy. Keep in mind the weight is not exactly in the middle, it's all in the center section so don't let the size of the bellhousing trick you into thinking it has weight. It's nice to have a friend help you drop it but not necessary if you have normal strength. W58 should be no problem solo, but it's always nice to have an extra hand. Now the 2nd hardest part is over. If you've got a R154 make sure you keep the washers and bearings surrounding the pressure plate and clutch in the proper order. W58 guys again have it easy and don't have to be so careful. Now if you left the clutch and pressure plate bolted to the engine, now is a good time to remove it. Six 12mm bolts and it should come right off. Easy eh? It's a good idea to replace a few things and do some basic maintenance while you've got the car this much apart. Clutch and pressure plate (obviously), throwout bearing, pilot bearing (it's a pain to remove so I wouldn't mess with it unless yours was bad), have the flywheel machined or buy an aluminum one, replace the rear main seal, replace the tranny rear main seal, replace the starter contacts (I highly recommend this one as it's less then $20 and doesn't take long). If you're feeling highly ambitious, break open the tranny and replace the 1-2-R shift fork. They are known to break after extended abuse/mileage. While you're in there, check your synchros for excessive wear, especially the 2nd gear one. A few other options you might want to do include flush the tranny with cheap fluid and then put your fluid of choice in (I recommend Redline MTL or LWSP), change the two shifter bushings, rebuild the slave cylinder, replace the slave cylinder hydraulic line with stainless steel braided hose, and last but not least consider the SOGI short shift mod. Give the inside of the bellhousing a quick cleaning and you're ready to go. Assembly notes: For the most part assembly is reverse of disassembly. Make sure you grease all the points that the TSRM recommends (basically the pivot points of the fork and the spline). R158 owners - make sure the bulge in the clutch disc faces the tranny. You'll find installation much easier with a friend or two since you'll need to tilt and spin the tranny to the perfect angle to get it to slide onto the motor. You can do it solo with just a hydraulic floor jack but IMO it's too dangerous to attempt solo. |